
How to Fix The CPU Has Been Disabled By The Guest OS?
If you have successfully installed and configured the operating system on a virtual machine. You might have been facing an error that says ‘The CPU has been disabled by default. Power off or reset the virtual machine’. Therefore, I will show you How to Fix The CPU Has Been Disabled By The Guest OS.
As you might know, Windows computers can’t support installing macOS by default. Unfortunately, Apple never allows you to install macOS on non-Apple hardware, you can only install macOS on Apple computers. So, most of users use virtual machines to install macOS and use. Virtual machines like VMware and VirtualBox. It is the only way to use macOS on Windows computers. And the procedure of installing macOS on a virtual machine is somehow lengthy but will perform like an actual PC.
There are many reasons that this problem might occur, the first problem must be that you have configured the virtual machine properly for your AMD system. Keep in mind that AMD systems are totally different from the intel ones, in that case, you need a different config key for setting up properly. And the other reason could be that you might have installed VMware and VirtualBox while hyper-v is installed.
Fix The CPU Has Been Disabled By The Guest OS
We have created a step-by-step guide on How to Fix The CPU Has Been Disabled By The Guest OS. All you need to do is to follow up steps down below and fix your error.
Alter the VM Hardware Compatibility to 10
As everyone knows that installing is important and without installing you need to do more steps I will provide two ways steps that will help you to do the process easily. The first way which you can do with the help of VMware with the wizard. And the second one is from vmx file. here is the quick guide on which you can do it.
Step 1. First of all, you need to go to the folder where the virtual machine file has been saved then right-click on that file and select Open With after that tap on the Notepad.
Step 2. Find there the version section and simply change the number of the version to 10.
Add Config Key For Virtual Machine
Step 1. Once you change the version number then do not close that window go to the end of the page and paste the following code
cpuid.0.eax = “0000:0000:0000:0000:0000:0000:0000:1011”
cpuid.0.ebx = “0111:0101:0110:1110:0110:0101:0100:0111”
cpuid.0.ecx = “0110:1100:0110:0101:0111:0100:0110:1110”
cpuid.0.edx = “0100:1001:0110:0101:0110:1110:0110:1001”
cpuid.1.eax = “0000:0000:0000:0001:0000:0110:0111:0001”
cpuid.1.ebx = “0000:0010:0000:0001:0000:1000:0000:0000”
cpuid.1.ecx = “1000:0010:1001:1000:0010:0010:0000:0011”
cpuid.1.edx = “0000:1111:1010:1011:1111:1011:1111:1111”
featureCompat.enable = “FALSE”
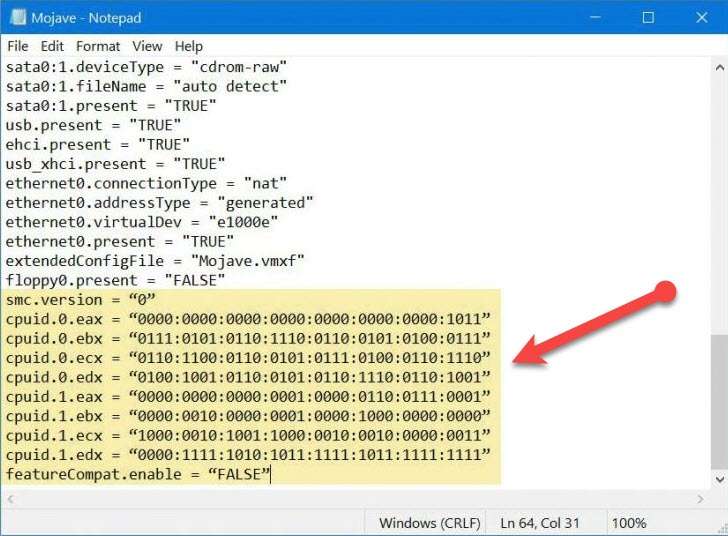 Paste the code
 Step 2. Once you have pasted successfully then hold and press Windows + S after that save it.
Step 3. Finally, turn the machine on after that start the process of installation.
Solutions to Fix The CPU Has Been Disabled By The Guest OS
If the above methods didn’t work properly, have a look at the below fixes.
1. Make sure you are using normal quotes. Sometimes you might use stylish quotes that VMware won’t accept and shows error like ‘not a valid boolean’.
2. Disabling featureCompat.enable works only on VMware versions less than 9. Make sure to change that to True.
3. cpuid.ss & cpuid.ds are no longer supported on the cpus. So, change cpuid.1.edx line to “0000:0111:1000:1011:1111:1011:1111:1111”
Final Words
It was all about How to Fix The CPU Has Been Disabled By The Guest OS? I hope this article is very helpful for you and that you have solved your issue. From this article, you will get something good. This was step by step guide on what you were searching for it. Further, this is the right place where you can easily solve your problem. After following these steps I hope you will not face any kind of problem. However, If you faced any kind of problem and if you have any type of suggestion then do comment.
Explore More:
Tagged
Share This Article
If you have successfully installed and configured the operating system on a virtual machine. You might have been facing an error that says ‘The CPU has been disabled by default. Power off or reset the virtual machine’. Therefore, I will show you How to Fix The CPU Has Been Disabled By The Guest OS.
As you might know, Windows computers can’t support installing macOS by default. Unfortunately, Apple never allows you to install macOS on non-Apple hardware, you can only install macOS on Apple computers. So, most of users use virtual machines to install macOS and use. Virtual machines like VMware and VirtualBox. It is the only way to use macOS on Windows computers. And the procedure of installing macOS on a virtual machine is somehow lengthy but will perform like an actual PC.
There are many reasons that this problem might occur, the first problem must be that you have configured the virtual machine properly for your AMD system. Keep in mind that AMD systems are totally different from the intel ones, in that case, you need a different config key for setting up properly. And the other reason could be that you might have installed VMware and VirtualBox while hyper-v is installed.
Fix The CPU Has Been Disabled By The Guest OS
We have created a step-by-step guide on How to Fix The CPU Has Been Disabled By The Guest OS. All you need to do is to follow up steps down below and fix your error.
Alter the VM Hardware Compatibility to 10
As everyone knows that installing is important and without installing you need to do more steps I will provide two ways steps that will help you to do the process easily. The first way which you can do with the help of VMware with the wizard. And the second one is from vmx file. here is the quick guide on which you can do it.
Step 1. First of all, you need to go to the folder where the virtual machine file has been saved then right-click on that file and select Open With after that tap on the Notepad.
Step 2. Find there the version section and simply change the number of the version to 10.
Add Config Key For Virtual Machine
Step 1. Once you change the version number then do not close that window go to the end of the page and paste the following code
cpuid.0.eax = “0000:0000:0000:0000:0000:0000:0000:1011”
cpuid.0.ebx = “0111:0101:0110:1110:0110:0101:0100:0111”
cpuid.0.ecx = “0110:1100:0110:0101:0111:0100:0110:1110”
cpuid.0.edx = “0100:1001:0110:0101:0110:1110:0110:1001”
cpuid.1.eax = “0000:0000:0000:0001:0000:0110:0111:0001”
cpuid.1.ebx = “0000:0010:0000:0001:0000:1000:0000:0000”
cpuid.1.ecx = “1000:0010:1001:1000:0010:0010:0000:0011”
cpuid.1.edx = “0000:1111:1010:1011:1111:1011:1111:1111”
featureCompat.enable = “FALSE”
Paste the code Step 2. Once you have pasted successfully then hold and press Windows + S after that save it.
Step 3. Finally, turn the machine on after that start the process of installation.
Solutions to Fix The CPU Has Been Disabled By The Guest OS
If the above methods didn’t work properly, have a look at the below fixes.
1. Make sure you are using normal quotes. Sometimes you might use stylish quotes that VMware won’t accept and shows error like ‘not a valid boolean’.
2. Disabling featureCompat.enable works only on VMware versions less than 9. Make sure to change that to True.
3. cpuid.ss & cpuid.ds are no longer supported on the cpus. So, change cpuid.1.edx line to “0000:0111:1000:1011:1111:1011:1111:1111”
Final Words
It was all about How to Fix The CPU Has Been Disabled By The Guest OS? I hope this article is very helpful for you and that you have solved your issue. From this article, you will get something good. This was step by step guide on what you were searching for it. Further, this is the right place where you can easily solve your problem. After following these steps I hope you will not face any kind of problem. However, If you faced any kind of problem and if you have any type of suggestion then do comment.
Explore More: