
How to Install and Use iCloud on Your Windows PC

In this article, I am going to guide you on How to Install and Use iCloud on Your Windows PC. As a Windows user, you might know that windows users really like to use Apple’s software and app. It happens that your iPhone gets damaged, in this case, you need to use iCloud in order to recover your personal files with the Apple ID on iCloud. iCloud is the same as the Google Drive and Microsoft One drive that we have on Windows PC. And it has many spaces in order to put our personal files and get space on the iPhone. On Windows PC as well, you are able to sync the data and file with the help of the iCloud from all your Apple devices. Syncing the data such as Photos, Videos, Contacts, and many more data.
if you think iCloud is only for Apple devices then I apologize to tell you that you are wrong because it can be run on Windows devices in order to sync their data from their Apple devices. this can be so easy for Apple and iPad users to quickly sync data using iCloud. Unluckily, the iCloud website cannot be linked with your Windows device. when you upload a photo on the photo app on the website then it can’t be possible that it should automatically sync your data and your iCloud in the background. To be unforgotten let e remember you that iCloud needs an Apple ID, you can make one here a new Apple ID on Apple’s Website.
 How to Install and Use iCloud on Your Windows PC
How to Install and Use iCloud on Your Windows PC
Now. you have to download the iCloud on your Windows PC. You can also find it from Google or simply click on the link below in order to download it. Then for the installation process make sure to follow the each step below.
Step 1. when the downloading gets completely finish. You need to open the download folder from PC and make sure to double click on the iCloud which you have downloaded
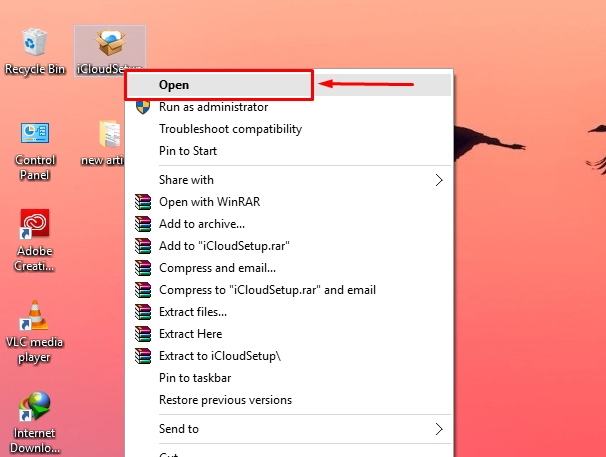 Open the iCloud
Step 2. when the setup opened, you have to agree with license and agreement of iCloud software, for that select the I accept the terms in the license agreement. And you have to click on the Install below.
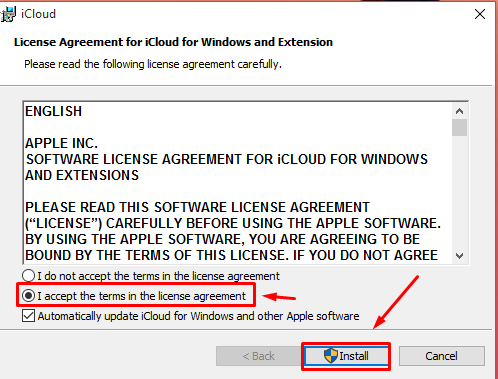 Install iCloud
Step 3. When the installation process gets finish you need to open the iCloud and enter Apple ID and password in order to be login.
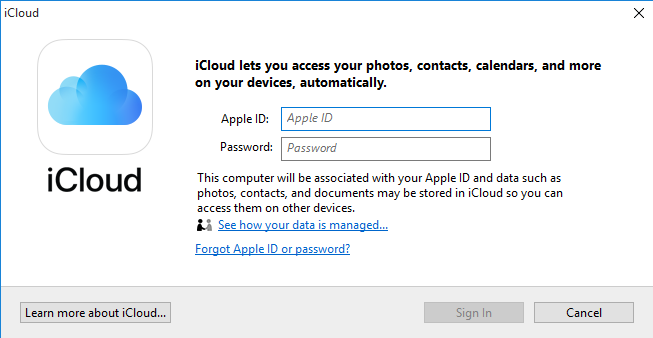 Login to you iCloud
Step 4. Choose any of the features you would like to sync your data with the devices. like, (iCloud Drive, iCloud Photos, Contacts, Calendar, Mail, Notes, etc.). Once done, you can sync your data on your PC.
Related articles
- How to Run Multiple WhatsApp Accounts on Android without Rooting
- Install and Use Safari on Windows PC: Safari for Windows
Final words
that’s all about How to Install and Use iCloud on Your Windows PC. I hope with this way you may be able to sync and use iCloud on your Windows PC. I wish it can be helpful for you. If you have any kind of issue or any question feel free to ask in comment section below. Also, give your beautiful feedback ad suggestions about this.
Tagged
Share This Article
In this article, I am going to guide you on How to Install and Use iCloud on Your Windows PC. As a Windows user, you might know that windows users really like to use Apple’s software and app. It happens that your iPhone gets damaged, in this case, you need to use iCloud in order to recover your personal files with the Apple ID on iCloud. iCloud is the same as the Google Drive and Microsoft One drive that we have on Windows PC. And it has many spaces in order to put our personal files and get space on the iPhone. On Windows PC as well, you are able to sync the data and file with the help of the iCloud from all your Apple devices. Syncing the data such as Photos, Videos, Contacts, and many more data.
if you think iCloud is only for Apple devices then I apologize to tell you that you are wrong because it can be run on Windows devices in order to sync their data from their Apple devices. this can be so easy for Apple and iPad users to quickly sync data using iCloud. Unluckily, the iCloud website cannot be linked with your Windows device. when you upload a photo on the photo app on the website then it can’t be possible that it should automatically sync your data and your iCloud in the background. To be unforgotten let e remember you that iCloud needs an Apple ID, you can make one here a new Apple ID on Apple’s Website.
How to Install and Use iCloud on Your Windows PC
How to Install and Use iCloud on Your Windows PC
Now. you have to download the iCloud on your Windows PC. You can also find it from Google or simply click on the link below in order to download it. Then for the installation process make sure to follow the each step below.
Step 1. when the downloading gets completely finish. You need to open the download folder from PC and make sure to double click on the iCloud which you have downloaded
Open the iCloud
Step 2. when the setup opened, you have to agree with license and agreement of iCloud software, for that select the I accept the terms in the license agreement. And you have to click on the Install below.
Install iCloud
Step 3. When the installation process gets finish you need to open the iCloud and enter Apple ID and password in order to be login.
Login to you iCloud
Step 4. Choose any of the features you would like to sync your data with the devices. like, (iCloud Drive, iCloud Photos, Contacts, Calendar, Mail, Notes, etc.). Once done, you can sync your data on your PC.
Related articles
- How to Run Multiple WhatsApp Accounts on Android without Rooting
- Install and Use Safari on Windows PC: Safari for Windows
Final words
that’s all about How to Install and Use iCloud on Your Windows PC. I hope with this way you may be able to sync and use iCloud on your Windows PC. I wish it can be helpful for you. If you have any kind of issue or any question feel free to ask in comment section below. Also, give your beautiful feedback ad suggestions about this.